Pages

Showing posts with label Science. Show all posts

Thursday, 21 November 2019

Gugurang - Science

Gugurang

Gugurang is a Philippine God of Volcanoes and is believed to live at ‘Mount Mayon’. He was given full control over the people and whenever they disobeyed him, he would give them a warning by letting the pit of the volcano rumble. If they were able to fix their mistakes then he would let them off but if they didn’t he would cause the volcano to erupt to wipe out those who sinned.


 This story retold by Damiana Eugenio made netizens believe that Gugurang was the one behind it whenever Mount Mayon would rumble or erupt. 

What really happens

Beneath the Earth, there are rocks that slowly melt and become a thick flowing substance that we call ‘magma’. Since it weighs less than the rocks around it, it rises and gets collected in the ‘magma chamber’. At some point, the magma gets through vents and cracks and gets to the surface. Magma that has erupted gets called ‘lava’.


Since I had a test, I could not finish or make any changes so this is all I had.

Tuesday, 19 November 2019

Atomic Science

4 things I have learned?

Charges
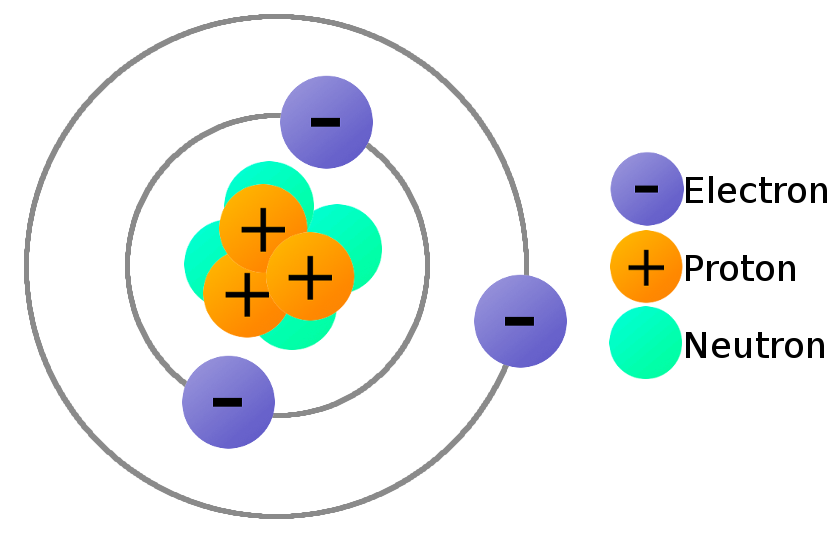
1. Positive, Neutral, and Negative charge

Electrons (-)
Protons (+)
Neutrons (0)


Periodic Table
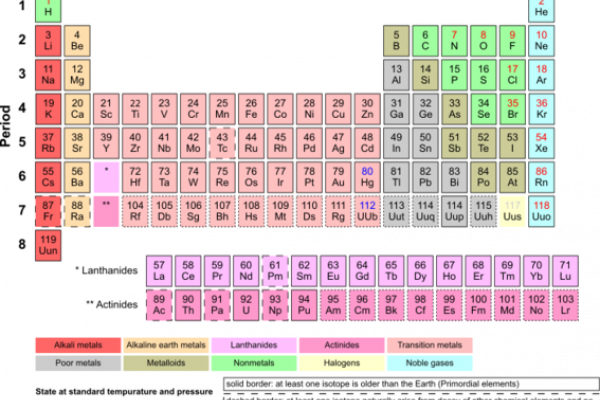
2. Periodic Table - Elements

In the periodic table, there are elements that use different chemical symbols, for example:

Gold - Au
Silver - Ag
Beryllium - Be
Iron - Fe
Copper - Cu


3. Equations

Equations are when 2 or more reactants are mixed together to create a product, for example:

Magnesium burns in oxygen to produce magnesium oxide

Magnesium + Oxygen ---> Magnesium oxide

4. HAZCHEM Symbols


Corrosive


Caution


Irritant

Acid Rain

What is acid rain?

Acid rain is when fossil fuel or natural gas goes to the air to create carbon dioxide, sulfur dioxide, and nitrogen dioxide. It will then go up to the cloud and will combine its molecules with the clouds. Then when it rains it will create "Acid Rain."

Diagram:

The diagram above shows us that the factory shown in the diagram will release the chemicals that will go to the clouds and then once it rains, the chemicals mixed in the clouds will turn to "Acid Rain."

Friday, 18 October 2019

Mount Sinabung

Mount Sinabung

Location: North Sumatra, Indonesia

Eruption: 

The most recent eruption of Mount Sinabung was on June 9th 2019 but on May 2016 the most recent deadliest eruption of this mountain happened. 

2019

The Indonesian volcano called "Mount Sinabung" erupted, which caused a massive column of ash and smoke of 2,000 metres into the air, which covered the local villages in debris. But there were no reported deaths or injuries from this eruption.

I think this eruption was a "Vulcanian" eruption and is a stratovolcano.


Explanation:

Volcanoes erupt when magma rises to the surface. If the magma is thick then the gas bubbles cannot escape easily which cause the pressure to build up as the magma rises. When the pressure is too much then the eruption happens.


Friday, 27 September 2019

Wind Racers

Research: Before making our wind racers we took time to research about different designs first. Our research was about different sail designs that we could use in order to make our racers faster.

Design: Our design was a triangular sail. This is because of us thinking that since the triangle has equal sides then this must help.

Build:

Materials:
-Cardboard
-Tape

In order to build our sail:

1. Cut out 2 pieces of cardboard into a triangle.

2. Stick the 2 pieces of cardboard onto the pole.

3. Make sure it's stable.

Test:

Our wind racer didn't do so well when it came to the distance because it only went 12cm, but the time it stopped moving was 6 seconds.

Redesign/Changes:

We didn't change the shape of our sail because we thought that the reason our sail didn't work was that we placed the sail the wrong way. So we kept the same shape of the sail but added a rectangular piece of cardboard in the middle of the sail for more stabilisation. 

Test:

Our second test went much better as the distance our wind racer covered was 50cm.

Evaluate: We think that our wind racer didn't work as well as the other wind racers because as we turned on the leaf blower, all of the weight of the cardboard sail accelerated downwards so our "car" went straight down. 

Overall we think that the activity was fun even though our racer didn't win.


Monday, 2 September 2019

Lever Experiment

Aim: To investigate the advantage of using a lever to lift a load

Hypothesis: I think the closer it gets to the load the more marbles you will need.

Results: The closer the pivot got to the load the lesser marbles were needed to balance it out.

Explanation: When the lever size changes then the force on the marbles will be greater than the effort applied.

Tuesday, 25 June 2019

Metals - Research

In Science we were given the task of choosing whether to investigate, research, create, or design, but they all have to be about Metals. 

I chose to do a slideshow about my research.

Slideshow:


Thursday, 20 June 2019

Corrosion Experiment

What are you investigating?

To investigate the factors that causes rusting in iron.

What do you think will happen? 

Nail Polish + Water - I think that the nail polish will protect the nail from corroding. The nail polish acts like a barrier.

Oil - I think the corrosion depends on what chemicals is used in the oil. Since we used pure vegetable oil, I don't think anything will happen.

Saltwater - I think the salt particles will help corrode the nails.

Calcium Chloride + Water - The chemicals in the powder will corrode the nail.

Magnesium + Water - I don't think the magnesium will do anything. So I think the nail will be fine.

Water - Since the water doesn't have anything mixed in it, I don't think anything will happen to the nail.

What is corrosion?

Corrosion is when a metal carbonate reacts with an acid it will form a salt, carbon dioxide and water. Carbon dioxide is a gas and can be seen as bubbles as the reaction happens.


Observations:

Nail Polish + Water - The nail polish helped the nail from corroding. This means that the part of the nail that was covered by the nail polish, didn't corrode.

Oil - The nail in the oil didn't corrode at all. It stayed just like how it was in the first place.

Saltwater - The nail in the saltwater corroded a lot.

Calcium Chloride + Water - The nail in the calcium Chloride didn't corrode as much but it still did corrode.

Magnesium + Water - The nail didn't corrode as much as I thought it would.

Water - The nail in the water corroded a lot, just like the nail in the saltwater.

Which was the best for preventing corrision? 

The best for preventing corrosion was the nail polish and the oil.

Which caused most corrosion?

Saltwater and Water caused more corrosion to the nail.


Friday, 12 April 2019

Science Project

In Science, we were given the task of making a poster, slideshow, or stop-motion of 4 things that we have learned about our topic.

I chose to do a slideshow.

My Slideshow:

Thursday, 23 August 2018

Observing Transpiration and Capillary Action

Aim: To observe xylem tissue and prove that they transport water up the plant.
Equipment: One stick of celery with the leaves still attached, a retort stand, boss head and clamp, a petri dish, water, food colouring, a knife or scalpel.

Method:

1. Make a cut across the base of the celery stalk to expose a new section of the stem.
2. Fill the petri dish with water and add a few drops of food colouring.
3. Place the celery stalk in the petri dish and gently clamp it in place using the retort stand, boos head and clamp.
4. Leave the stalk undisturbed for 24 hours.
5. Remove the stalk from the clam and petri dish. Cut the stem about1/3 of the way up the stem.


Thursday, 2 August 2018

Observing Reflection in Curved Mirrors

Today in Science we did an experiment using concave mirrors and convex mirrors.

Concave mirrors have shiny surfaces on the inside of the curve. One example of a concave mirror is when you look at a spoon, the bowl of the soon is concave.

Convex mirrors have shiny surfaces on the outside of the curve. An example is the back of a spoon.


Aim: To investigate the reflection of light rays in concave and convex mirrors.

Equipment: Ray box, triple-slit ray slide, concave and convex mirrors, power supply.

Method:

1. Set up your ray box, triple-slit ray slide and power supply.
2. Place the mirrors on your book as indicated below. Place the ray box at the top of the page and shine the 3 rays of light at the mirror.
3. Ensure that the middle ray of light is hitting the mirror at a 90-degree angle.
4. Carefully trace the direction of the three incident rays and the three reflected rays.

Results:
When the light hit the concave mirror the reflection made some sort of "X" with the lights. When the light hit the convex mirror the reflection when sideways.


Tuesday, 31 July 2018

Investigating the Laws of Reflection

Today in Science we did a practical about lights. We also learnt about reflections.

Aim: To investigate how light behaves when it hits a plane (flat) mirror.

Method:
1. Collect a ray box, power supply and single-slit ray slide from your teacher, and set them up to produce a single beam of light.

2. Place a plane mirror on the diagram of the protractor as described below.

3. Vary the angle of incidence and record the angle of reflection in the results table.

Result:

0 degrees = 0 degrees
10 degrees = 10 degrees
20 degrees = 20 degrees
30 degrees = 30 degrees
40 degrees = 40 degrees
50 degrees = 50 degrees
60 degrees = 60 degrees
70 degrees = 70 degrees
80 degrees = 80 degrees

The angle of reflection was the same as the angle of incidence. This could because the mirror we used was just flat and it didn't have any other shapes in it.

Monday, 18 June 2018

Hydroelectric

Give two reasons why Hydroelectric power is useful to us:

  1. Using water, wind, solar and geothermal resources is better than using resources like coal, oil, and gas because they are renewable, unlike the coal, oil, and gas.
  2. Water is provided free by nature so we don't have to go digging everywhere in order to find coal and risk endangering human society or the animal society.

Disadvantages of Hydroelectric power:

Disturbs aquatic life: Hydropower plants are constructed across rivers, and this can interfere with aquatic life. There is a huge chance of aquatic life finding their way into the penstock and eventually into turbines where they will get killed. Building dams in a few certain places can also interfere with mating patterns, seasons and breeding areas of the aquatic animals.

Construction needs large area: In order to build a dam, people have to install power production units, plus transformers, and fasten them onto the main grid requires a big piece of land. People may need to clear out forests or places where people live in order to achieve getting a piece of land. If we were to keep clearing out forests or places where people live then where would the animals go? Where would the humans go? If we put the human houses with the other human houses then it will get crowded. People will use more fossil fuel, and we could get more pollution. 

Hydroelectric dam:


Clyde Dam in Central Otago

Tuesday, 8 May 2018

Diffusion

This is what it looked like before we added the purple crystals in the water.

I think the particles in the hot water were vibrating more so this caused the pigment to spread faster than the pigment in the cold water.

This particles in the cold water were moving a lot slower than the particles in the hot water.

I think the temperature of the water might have something to do with how the pigments and particles move.


Wednesday, 2 May 2018

Heating Brass Ring and Ball

Yesterdays Experiment:
In yesterdays experiment we heated up a brass ring and ball. We were observing it while we were heating them up to see what would happen to them while they're being heated up.


Observations:
We saw that when we heated up the ring it started turning bronze after a few seconds. This could be because the ring is absorbing the heat of the flames and in some sort of way the heat is having a reaction with the material used to make the ring.


I saw that the ball turned from bronze to purple, but it did not glow red like the ring did. This could be because of the shape of the two things. It could also be because the ball was, well a full sphere and the ring had a hole in the middle of it.


We also noticed that when the ball and ring were put in the water, the water would start boiling and splashing everywhere. We're guessing that the temperature has to be above 100 degrees for the water to start splashing everywhere, so when we put the ball and ring in the water they must've been over 100 degrees. Because when you boil water they go up to 100 degrees but it doesn't pass that number, it also doesn't start splashing everywhere on its own.

We noticed that once it has been fully cooled down the ring and the ball will turn back to its original colour, and the same thing will happen again if you were to heat up and cool it down again.

When the two things have been heated up it was a bit difficult to pull out the ball from inside the ring. This could be because the particles in the brass ball have expanded due to the heat energy from the Bunsen burner. The ring has also expanded, this could be because the particles movements have increased, making the hole in the ring expand more.


Monday, 26 March 2018

Separation via chromatography

Today in Science we did the same experiment as last week. Though this time we used markers instead of leaves we've ground.

Today's experiment and last weeks experiment are very different.

Last weeks experiment:
For last weeks experiment, we grounded leaves to use.

The pigments from the leaves did not work as well as we expected. This is because we used a lot more solvent than the solute.

If we used more solute than the solvent then maybe it would've worked better.

This weeks experiment:
This weeks experiment worked perfectly. We can finally see the different pigments in one colour.

This is probably because the pigments in the markers are more concentrated than the ones in the leaves.


As you can see in the picture there's a colour that goes up faster than the other colours. This is because that colour is lighter than the other pigments.

The best way to think of it is having a pebble and grains of sand and dropping them into a stream. Which one will fall first? The sand will fall first, right? This is because the sand is a lot lighter than the pebble.

Wednesday, 21 March 2018

Extracting Water From Coke

Aim: To see how much sugar is in normal/diet coke.


Methods:
-We first set up our equipment

Materials:
-Beaker
-Tube
-Bunsen Burner
-Stand
-Boiling Tube

Results:
On our first try, our experiment overflowed and exploded and landed inside the beaker. This is because we added too much heat and the tube was too close to the bottom of the boiling tube.


On our second try, our experiment had finally work and the water was finally getting separated from the sugary substance. It has worked because we were no longer adding too much heat to the boiling tube and the tube was no longer close to the bottom of the tube.

Tuesday, 20 March 2018

Chromatography

Chromatography: The act of using a chemical to separate a mixture.

Method:
  1. Grab some leaves (5 pieces of the same type)
  2. Rip them into small pieces
  3. Put them in the pestle
  4. Grind it using the mortar 
  5. Put a few drops of Ethanol
  6. Then grind it completely.

Wednesday, 7 March 2018

Dilution Series

Aim: Investigating diluting a solution
Result: The more solvent we added to the solution the less concentrated it became.

Monday, 26 February 2018

Filtration

LO1: Design and carry out an experiment
LO2: Explain separation via filtration
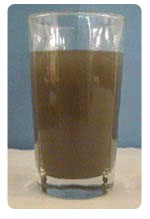
Image result for muddy water
Experiment:
-Separate mud from water
-Use only equipment provided in ice cream container
-Record progress on Blog, include notes, changed, photos etc
-Change the design, learn from each trial


Materials:
Image result for cotton balls
  • Paper towels
  • 1 bottle
  • 2 plastic cups
  • 1 thread of string
  • Cup of muddy water
  • Cotton balls
  • Cloth (Kind of a t-shirt texture)
Steps:
  1. Get all your materials ready
  2. Take the lid off the bottle
  3. Cut the bottom part of your bottle
  4. Take your paper towels and carefully put them inside the bottle
  5. Take your cotton balls and also put them inside the bottle (Leave 1 cotton ball for later)
  6. Take the leftover cotton ball and put it inside the nozzle
  7. Take your piece of cloth and put it on top of the hole you made at the bottom of the bottle
  8. Push your cloth inside deep enough so that the water wouldn't spill out
  9. Get your string and tie it around the cloth and the bottle
  10. Pour your cup of muddy water in carefully
  11. Wait for the results


Pictures:

(We forgot to take a picture of us putting the cotton balls in)


Cutting the bottom part of the bottle


Putting in the paper towels
Tying cloth with a string

Finished project


Observation/Conclusion: 

Our design worked well because the water we purified is clear, and it doesn't have huge bits of dirt in it.

Everything went well, except the colour of the water after it has been purified. My team worked okay together and there wasn't any fights or anything. 

I think our water is clear because of how many stages it went through, it went through 4 stages. It first went through the cloth (Catches all the unwanted dirt), it then went through the cotton balls (Purifies the water), it also went through the paper towels (Also purifies the water) and it finally goes through the last stage, the cotton ball.

The paper towels, cloth, cotton balls and string (helped tie the cloth onto the bottle) were very helpful. They all helped re-filter and make our design.

My team modified our design by taking out the cotton balls. This made the water drip quicker. This is because the paper towel has turned from dry to wet.

Whenever we re-filter our water, we change the paper towels. We do this so that the excess water that the paper towel has absorbed wouldn't get mixed with the water we are about to re-filter.

Aim:
Even though it is clear, the water still has a yellow colour to it, it does not look like drinking water. I looked closely at our purified water and noticed that there are still tiny bits of dirt in it. So my group's aim is to make our water clearer and cleaner. 

This may lead us to change our design and try out something else.

Link to an example:
Mrs Boothby's Science Blog